
Before Fighting Dhuum
-
Required Masteries and Mounts
- No masteries required.
- No mounts required.
-
Special Roles
-
Skill Changes
- Mobility is highly valuable in this fight for the many mechanics.
- Condition damage is generally preferred, but the Enforcers can be slow to die if the entire squad is condition-based DPS.
The commander should put markers down that match the diagram below.


Tanking
The tank is determined by Toughness so you need to beat the rest of the squad, but the fight does not require high Toughness. Dhuum hits the squad like a truck but does very little damage to the tank.
Unlike most bosses, he does not walk all the way towards you. If you are trying to give your squad boons, you need to walk forward until you’re touching the edge of his hitbox.
If there is a (Lesser) directly behind Dhuum in the standard tanking spot, move a bit so the squad can stand behind him.
The tank can do green 3 (G3) but it will cause Dhuum to be confused and spin around like the Messengers do.

Kiting
A kiter is required and will do Green 2 (G2). There is moderately high ticking arena damage so the kiter needs to self-sustain and have access to Swiftness or movement skills.
When learning to kite, you can request that the squad does not use the speed orbs that Desmina throws out. They are helpful to get away from Messengers if your skills are on cooldown or to get to your greens.
The goal of the kiter is to aggro the Messengers so they stay off the group. Messengers stay alive for 15 seconds and aggro to whoever hit them first. This includes AoEs that have been placed on the ground. They cannot be killed. If you successfully get their aggro, a message pops up on screen saying "Dhuum's Messenger is fixated on you." and the border around your icon in the squad UI is highlighted red.
Messengers are incredibly stupid and slowly spin in circles, shamble over to you, spin around if you change direction, stop moving, and are just generally confused. Use this to your advantage so you can maintain distance. The AoE around them will Down you in seconds so always keep some distance.
During pre-event, Messengers spawn every 10 seconds. During the main fight, Messengers spawn every minute around the xx:25 mark. You can remain with the group the rest of the time during the main fight. If you are unable to rejoin the group during (Greater), be prepared to condi cleanse and heal yourself.
If there are Messengers fixated on you when you do your Greens, you can use a movement skill to put distance between yourself and the Messenger. When you go up, it follows you as if you were still on the ground. Avoid letting the Messengers sit on top of the Reapers while you are doing Greens.

Pre-Event
The objective is to keep the Reapers alive so they can finish their ritual and defeat Dhuum.

There will be 3 main things to watch out for: Enforcers, Messengers, and Greens. The main group will be dealing with the Enforcers, while a dedicated kiter handles Messengers, and 3 assigned people will handle Greens. Deathlings are small spiders that continuously spawn throughout the fight. These can kill a Reaper so always kill these as you pass by them. Reapers can be healed easily by the squad’s healer.
Enforcers - (Skeletons)
Enforcers are large skeletons that look like Steve from the Halloween Labyrinth. They walk toward the nearest Reaper and are immune to hard CC. They take less damage from conditions so an entirely condition-based squad will be much slower to kill them than a power squad.
Enforcers do a lot of damage; Evade/Dodge/block the small orange cone in front of them.
They spawn in the four corners of the room. Red orbs traveling from Dhuum's throne indicate where they will spawn.
Messengers - (Golems)
Messengers are large Flesh Golems that spawn every 10 seconds from red orbs floating from Dhuum's throne. They spawn around the room in between the symbols.
Kiters are responsible for keeping the Messengers off the group. Messengers stay alive for 15 seconds and aggro to whomever hit them first. This includes AoEs that have been placed on the ground. They cannot be killed. If you get their aggro, a message pops up on screen saying "Dhuum's Messenger is fixated on you." and the border around your icon in the squad UI is highlighted red.
Flesh Golems have a large orange AoE ring around them, dealing heavy damage to anyone touching it. Standing in one will Down you within seconds.
Desmina throws orbs around the middle of the arena that grant Superspeed. Unless the kiter says otherwise, leave the orbs to them. If you need to deal with Arcing Affliction (Bomb) or a Green, use an orb if you absolutely will not make it otherwise.
Greens

Every 30 seconds beginning at 9:30 on the timer, Dhuum attempts to grab a Reaper. A large green AoE spawns around it and closes after 5 seconds. The player inside is sacrificed instead of the Reaper and is split from their soul. Flying into the middle instantly kills you. If there is not a player there when it closes, Dhuum will kill the Reaper and then the entire squad.

The player is lifted into the air and must collect 5 orbs within 15 seconds in order to reunite with their soul. There are 2 buffs on your bar: one is counting down from 15 and one is counting up to 5 orbs that you collect.
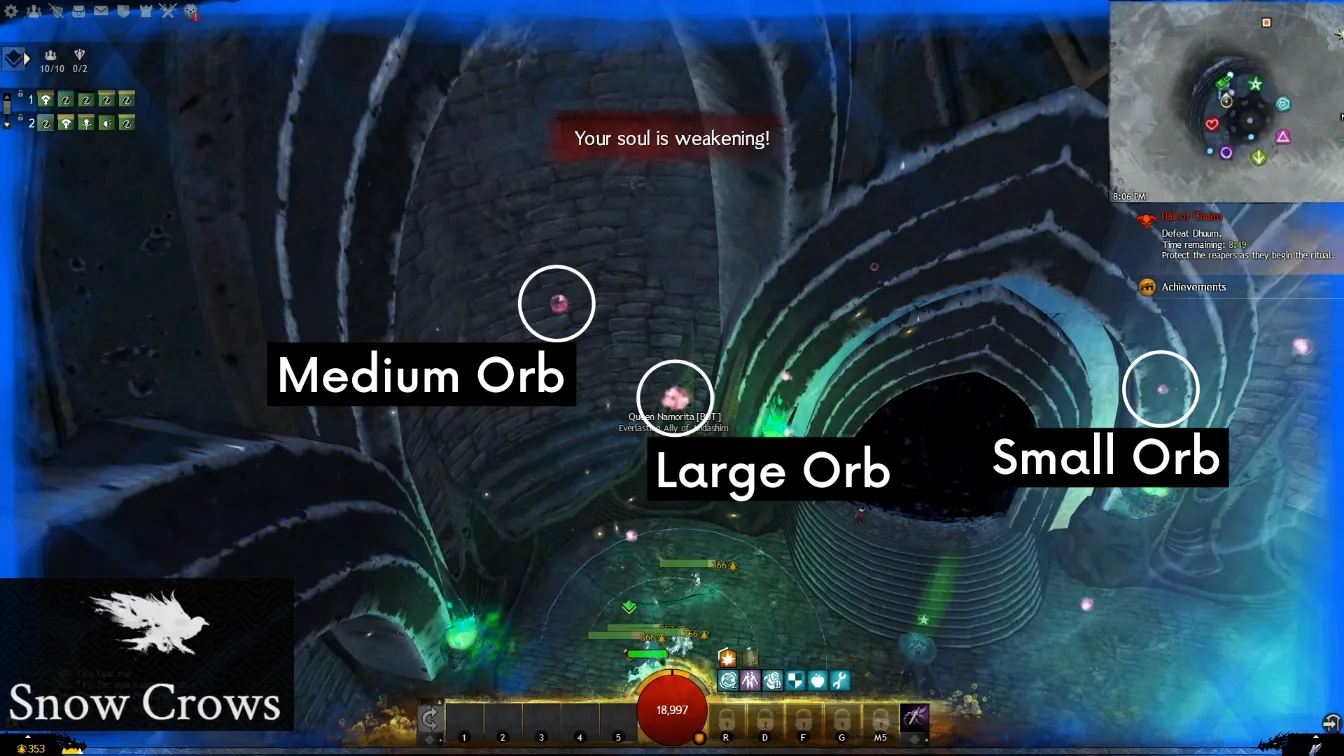
There are many small, 1 medium, and 1 large orb (there isn’t a huge difference in size). There is always a large orb clockwise from the starting position that should be picked up. Picking it up prevents the Enforcers from spawning during the main fight.
As soon as your feet leave the ground, start heading clockwise to pick up the large orb that is 2 markers away from where you started (e.g. if you left the ground at Arrow, go to Heart.
The medium orb spawns in a random location so don’t bother looking for it. Picking up a medium orb stops a Messenger from spawning. Some kiters prefer that medium orbs are not picked up so it doesn’t throw off their routine. If you do pick one up during the main fight when Dhuum is off his throne, let the kiter know.
There are orbs floating above and below the plane that you are on. They are a lie. You cannot change your vertical level like you can on the Eater of Souls Statue. Only focus on getting the orbs on your level.
Orbs get pulled into the center and their hitboxes are slightly behind them. Stop in front of an orb and wait for it to go through. Stay near the middle so there are more orbs to grab.
Use any combination of 5 small/medium/large orbs (prioritize getting the large orb) to be reunited with your soul and return to the ground. Once you get your fifth orb, you will automatically be put back onto the ground in the same spot you went up in.
After successfully completing a Green, you are invulnerable for a few seconds (there is no indicator buff). You get the Fractured buff for 80 seconds and cannot do the next 2 Greens. If you have the debuff and stand in another Green when it closes, you will instantly die and the Reaper will be sacrificed if there is no other player there.
Green Assignments
Because of the 80 second cooldown, 3 players are assigned to do Greens - G1, G2, and G3. G1 is usually done by a DPS, G2 is done by the tank in the pre-event and then the kiter during the main fight, and G3 is done by a healer, the tank, or the person with Arcing Affliction. Anyone can do any green, but those are the most common assignments.
G1 should clear the Star reaper every time they run by.
Arcing Affliction - (Bombs)
At 9:00 on the timer, a random player is given Arcing Affliction (Bomb). During the pre-event, anyone can be afflicted. During the main fight, the tank is immune.

The player selected has a Special Action Key called Expel Energy (SAK), a red timer above their head that fills up, a large green glow around them, an audio “ding” notification, and a notification on screen that says “[player] is afflicted!”.
The general recommendation is to let the 13 second timer run out and go off on its own. During the pre-event it doesn’t matter, but during the main fight it does alter the timer which can cause mechanics to happen at the same time. There are many different strategies for bomb timings, but not blowing early is easiest for new groups. If no bombs went off early, they will line up so the person who gets Arcing Affliction right before (Greater) will not have to leave.

The bomb has a massive radius. On your minimap there is a clear area around your dot; that is the radius of the bomb. Damage dealt is based on proximity so if you stand next to someone, they will be Downed. Squadmates who are in the foggy part of the minimap are safe from damage.
When you blow up a bomb, try to not have any squadmates within the clear portion of your minimap (the Fog of War). Be aware of surroundings because a dot might be near you, but it could be a Green-goer up in the air. They will not be damaged by the bomb and are immune for a few seconds when they land.
You cannot get a bomb again for 40 seconds because of Residual Affliction - a debuff making you immune from the mechanic until the time runs out.
Watch out for your kiter and people doing greens.
Phase 1 (100% - 60%)
At 8:00 on the timer, Dhuum will get off his throne and walk towards the player with the highest Toughness. He has a huge cleave that leaves many orange circles on the ground. It is vital for the squad to stack directly behind Dhuum to not get cleaved. Standing in the front half of his hitbox counts as being in front of him. Stand directly on the red circle of his hitbox.

Assuming that all large orbs were picked up during Greens, the final Enforcer will spawn in the corner near the first tanking location. Cleave it down before it reaches the Reaper next to Dhuum. If large orbs continue to be picked up, no more Enforcers will spawn. If an orb is missed, the next Enforcer will spawn clockwise 30 seconds later.
Greens and Arcing Affliction (Bomb) continue throughout this phase and there are 3 new mechanics: (Scythe Slam), (Lesser) and (Greater).
Cull - (Scythe Slam)

At 90% health, Dhuum turns around and slams his scythe down behind him, using . There is an orange AoE indicating where it will hit. Cracks come out from the AoE and flash bright green 5 seconds later. Any players standing on the cracks when they flash are Feared for a long duration. Dhuum uses every 30 seconds.
Death Mark - (Mark/Lesser)

At 7:05, Dhuum targets a random player, disappears into the ground, reappears at their location, and begins channeling a large orange AoE called . When the AoE is fully expanded, green fire appears and any players in the AoE are Knocked back 1,000 units, separated from their souls, have their boons stolen, and get the hastened demise debuff.

If you are hit, you will only have a few seconds to retrieve your soul before you are killed by the hastened demise debuff. Your soul is a bright white-blue light directly ahead of you.
As soon as Dhuum disappears into the ground, the group should run to the next tanking spot. Running too soon can cause the AoE to be dropped on one of the Greens. It does not do damage to Reapers, but will kill the Green-goer. Dhuum appears near the edge of the AoE, so running behind him is a shorter distance than running in front of him.
The AoE remains for 2 minutes and does massive damage to anyone who touches it, but does not split players from their souls after it is already on the ground.
Greater Death Mark - (Greater, Big Succ)

Every 80 seconds starting at 6:25, Dhuum dips into the ground and reappears in the middle of the room. All players are Knocked back 1,000 units, separated from their souls, have their boons stolen, and get the hastened demise debuff.
As soon as Dhuum disappears into the ground, turn your back to the wall and back up. Stay stacked with the group and run forward as soon as you get Knocked back.
Your character is Knocked back based on the direction they are facing so having the wall behind you limits how far you will go. The shorter the distance, the shorter the run is to retrieve your soul.
(Greater) deals 20% of your max health and applies 6 stacks of Torment. Healers should use condition cleanses and heal the group back up as soon as possible.

Immediately after , Dhuum uses (Suck) to suck players in. He has a moderate-sized orange AoE around him that deals massive damage.
As soon as you retrieve your soul, turn around and start running away from Dhuum to avoid getting sucked in. Use boonstrips on Dhuum and use ranged attacks on the Deathlings at star.
also removes (Bomb) and (Shackles). If you get the bomb <6 seconds before the attack, you can stay with the group and it will be removed.
Kiter: remember to grab the Messenger heading to Star during .
Phase 2 (60% - 10%)
This phase continues identically to phase 1 with two additional mechanics: (Shackles) and (Cone). All other mechanics and timings remain the same.
Soul Shackles - (Shackles/Split)
Beginning at 60%, the 2 closest players to Dhuum have their souls shackled together. The tank cannot be selected.
Red text saying “Your soul has been shackled to another” appears on screen, as well as a ding sound effect and a bright blue fire around the players affected by (Shackles).
The two players need to get about 1,200 units away from each other to break the chain. It can be useful for players with movement skills to bait this so they can quickly get away from the other player. Players typically say “throne” or “door/stairs” to indicate which way they are going. Pick a direction and stick to it if you called it first.
You begin taking heavy damage after 4 seconds and one of the Reapers says “Your souls are linked! Separate!”. You continue to take damage until the shackles are broken. If one player is Downed, the other one will still take damage until the shackles are broken.
The effect is removed by (Greater) so you can stay with the group if you get <4 seconds before the attack.
Slash - (Cone)

At 30% Dhuum begins using (Cone). It is a cone shaped attack that pulls and boonstrips while dealing damage.
Phase 3 (10%-0%)
At 10%, the fight timer will reset to 1:45. Dhuum turns Invulnerable, separates all players’ souls from their bodies, and lifts everyone up into the air as if they were doing a green.
Get out of the middle of the room or you will die when you are lifted up.
Everyone needs to collect 5 orbs within 30 seconds to avoid death. As soon as players are lifted into the air, the commander should pop a ready check.
Once you finish getting your 5 orbs, you will be teleported to the ground in the center of the room inside a protective bubble created by Desmina. When your feet touch the ground, click “yes” on the ready check. If you are dead, click “yes” as soon as the prompt appears. The healer usually holds the ready check.

When everyone is ready, boon-givers should prioritize giving the squad Swiftness, Quickness, Protection, and Regeneration. While boons are being given, the rest of the squad should sort themselves out so there is one person standing in front of each of the seals. Typically G1 goes to Arrow, G2 goes to Circle, G3 goes to Heart, and the other 4 seals are a free-for-all.
When the person holding the ready check has given their boons, they should click “yes”. Everyone runs out to their seal and channels, then turns around and runs back. The arena does heavy damage outside of the bubble so use Dodges, heal skills, and movement skills to minimize time spent outside. The seals must all be channeled within 10 seconds of each other so wait until the ready check pops before you run out. If there are fewer than 7 people alive, players with movement skills should channel the extra seals.
When all the seals have been channeled, Dhuum becomes attackable for 20 seconds. After that time, he will become untargetable again. Conditions will continue to tick so condition builds are strong here. If Dhuum doesn’t die within the 20-second window, the seal channeling process has to be completed again.
If a second burn is required, the commander should do another ready check, boon givers should give Swiftness, Quickness, Protection, and Regeneration, and everyone runs out to channel once the ready check pops. This process is repeated until Dhuum is dead or the timer runs out, whichever comes first.