While completing this dungeon you can use to maximize your damage output.
Once completed, this dungeon path will reward you with:
- 76 Silver
- 100 Tales of Dungeon Delving
- Experience

Durmand Priory Camp
Upon entering the dungeon, go near the Priory Explorer to trigger a cutscene. The door behind him will open afterwards, exposing you to the Elite Graveling Breeder.
The Elite Graveling Breeder is surrounded by Spike Traps that appear and disappear every few seconds. You cannot mitigate the damage in any way, so wait until they are gone or walk over the coffins to the right. The Breeder will either hit you with attacks that deal power damage and Weakness or summons Graveling Hatchlings that deal a lot of Bleeding.
The Elite Graveling Breeder has no breakbar. CC him regularily to prevent Hatchlings from spawning.
Upon killing him, a door will open and you can follow the 3 Path NPCs to select the path at Shrill Sunderbark after a small dialogue.
You can use Swiftness or even Superspeed to speed up the NPC escort.
Ossuary Crypts
Follow the stairs. There will be a Graveling Burrow spawning at the bottom of the stairs that summons Graveling Hatchlings. Those deal a lot of Bleeding. This event is not required for path completion and can therefore be ignored. If you decide to kill the Burrow, keep in mind he does not take any Condition Damage.
The Graveling Burrow event won't spawn until the path has been selected. Simply keep the path selection window open and delay it for an easier time.
The next room has a lot of Spike Traps and Flame Jets that can easily kill you if you dont pay attention. Hug the wall of the left and jump straight over the fence instead of going down the stairs to avoid them.
Spider Queen
The room you are in is filled with Spider Hatchlings, that are either Level 35 or anything between Level 1-5. They shoot projectiles that will inflict Poison. Bringing a reflect or projectile destruction might help. Additionally, the room is filled with 4 Gargoyle Heads that don't take Condition Damage. They shoot AoEs that will shoot AoEs that inflict Burning. Some Heads are too high for most melee attacks and require ranged attacks if you decide to kill them.
Once you've killed all low-level Spider Hatchlings the Spider Queen spawns with some additional Spider Hatchlings.
You should either kill the Spider Queen very fast by CCing and bursting her down, bring reflects or kill all Spider Hatchlings and Gargoyle Heads before spawning the Spider Queen in order to reduce pressure.
The queen has 3 attacks:
- Entangling Web: She will shoot white spider webs in front of her that deal medium damage and Immobilize each hit. Try to Dodge behind her while she charges up this attack.
- Bite: She will shift her body towards you and deals extremely high power damage, Weakness and 6 stacks of Bleeding. Only happens when fighting her melee.
- Venom Spray: She will shoot 3 AoEs that inflict Poison. These cannot be Dodged, blocked or reflected.
If you struggle to fight the Spider Queen, try to clear the room completely and then range her. She won't follow you and this way, you only have to deal with the Venom Spray attack.

Foefire's Heart
The corridor that opens upon killing the Spider Queen contains a few Elite Graveling enemies and a Champion Graveling Stalker. They can kill you extremely quickly. You can either kill them or use Stealth to bypass. Furthermore, the room is full of the undodgable and unblockable Spike Traps you've encountered at the beginning of the path. Every now and then, there are safe spots for you to carefully plan your next steps. Pulling the chain at the end of the corridor deactiavates all traps. On the middle island in the main room, you will encounter Lieutenant Kohler.
You may also encounter a Cave Troll here that can spawn at multiple random points throughout the dungeon. He is super deadly and can wipe whole parties quickly. He is not required for path completion, hence it is advised to just run away from him.

Lieutenant Kohler
Kohler is an optional and is not required for path completion. Although, killing him activates , so you can consider if it is worth for you to kill him or not. He will spawn 2 Elite Ascalonian enemies every 25% of his health. Kill them passively or even actively to reduce pressure. Kohler is a tanky boss with a lot of attacks:
- Scorpion Wire into Dagger Storm: Just like Thief's and . Scorpion Wire is indicated by him charging his sword, which will turn golden. It will deal 0 damage to you, but can Pull you up to 1200 range. Afterwards, he will Dodge for a few seconds and afflict Weakness, Cripple and 2 stacks of Poison each hit.
- Hornet Sting into Monarch's Leap: He Dodges away from his target and leaps back to it, inflicting Cripple.
- Flanking Strike into Flanking Stab: He leaps around his target, dealing extremely high power damage on his second strike.
- Serpent's Strike: He leaps around his target, deals mediocre power damage and inflicts Poison and Vulnerability.
- Heartseeker: Just like Thief's . Deals more damage the lower you are.

Archive of the Resting
Head south of Kohler and down some stairs that have fire-shooting Gargoyle Heads. Jump on top of the heads to not get hit. In the following room, you need to defeat 6 uncritable Graveling Burrows before Hodgins dies. Only 2 Burrows will be alive at the same time and killing one will cause another one to spawn, that means you have 2 seperate chains of 3 Burrows each. The Burrows will spawn more Gravelings the longer the are alive that will try to kill Hodgins. If the event fails, Revive and talk to him again to restart it. The spawning pattern is as follows:

After the event succeeded, you unlock . You need to walk up the stone stairs and the wooden plank next to the waypoint to collect the first scepter.
You can place one player next to Hodgins to defend him if he keeps dying.
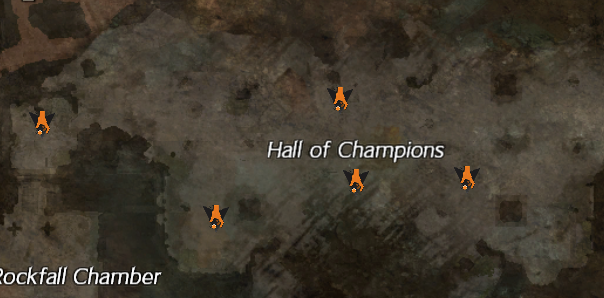
Rockfall Chamber and Hall of Champions
Go back to Foefire's Heart, either by using or walking, then head west. After traversing the door, you should see a slope in the north that you need to climb up. After going through the door, make sure to stay as left as possible and to not go straight into the next room, because this will trigger some Oozes that are annoying to fight and avoidable. Instead, go through the archway to the left and into the room.

You need to find 5 pieces of the second scepter in the room north, the Hall Of Champions. Each of the pieces is guarded by a group of Graveling enemies, so either use Stealth to pick them up or escape the enemies quickly. After collecting all 5 pieces, talk to Hodgins to finish the event. Finishing the event will enable .
You should leave one player behind to instantly talk to Hodgins after all 5 pieces have been aquired to speed up the process. If not, he will tend to get in fight with the Gravelings near the door and you cannot interact with him while is is eager to fight them. If everyone is out of combat due to good Stealth usage, players may also use the newly created waypoint.
Graveling Tunnels
Leave the room with the the way you entered it to not trigger the Oozes. South of the room's exit, you will now find that the entrance to the Graveling Tunnels. The entrace is filled with Gravelings and hidden Grubs. The tunnels themselves are filled will Gravelings and Gargoyle Heads. Use the map at the top of the guide to know where to go. Either use Stealth or run through coordinated and fast. In the Lair of the Patriarch, the Howling King is waiting for you.
It is advised to Stealth through the Tunnels, because otherwise, the Gravelings from there will follow you into the endboss room. If you did not manage to stealth, go to the northernmost niche in the Lair of the Patriarch to lose aggro.
Lair of the Patriarch
Howling King
While fighting the Howling King, he will spawn 7 Elite Gravelings in regular intervals which can deal quite a lot of damage. Other than that, he has 2 attacks:
- Spirit Scream: This attack can come in two variations. A more powerful one, indicated by a huge, azure light beam, that will Daze, inflict Cripple and 4 stacks of Confusion and high power damage each hit, or a smaller, less opaque light beam that inflicts Weakness, 3 stacks of Confusion and a bit of power damage. You can sidestep this attack or nullify it by standing behind the Howling King.
- Ring of Fire: Similar to the Elementalist's . He will cast two rings that will inflict Burning in quick intervals. Simply stay away from them to avoid the damage.
