While completing this dungeon you can use and to maximize your damage output.
Once completed, this dungeon path will reward you with:
- 61 Silver
- 100 Tale of Dungeon Delving
- Experience

Mansion
Path selection and beginning
Select the path in the inner courtyard of the Manor at Exemplar Talie after watching a cutscene.
When first enterting the dungeon, you can instantly teleport to to save some seconds.
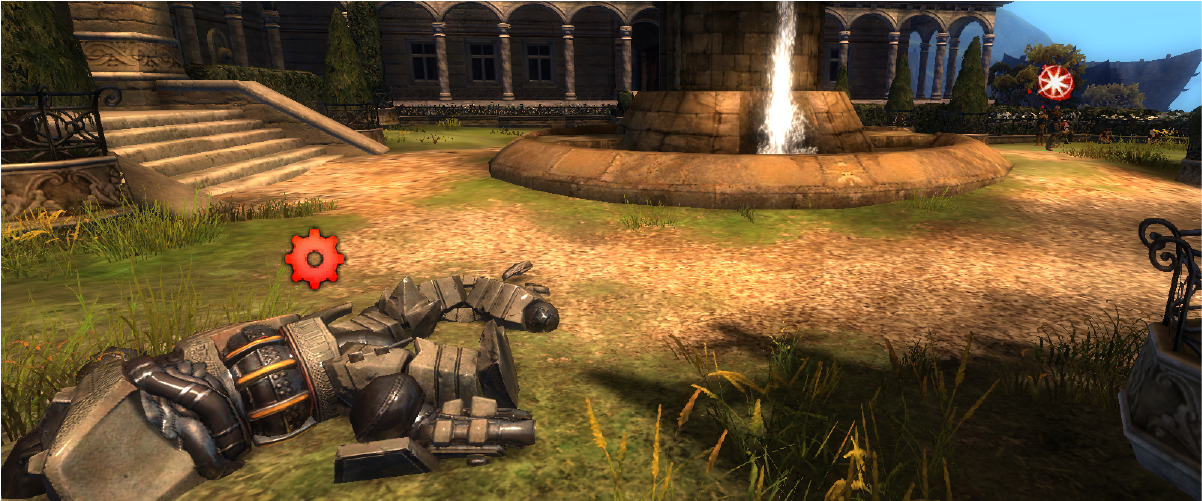
Go back into the manor and turn right to find Traffa. Talk to her and lead her back into the courtyard to interact with the broken golem in the corner.
After interacting with the golem, stand on the elevated ledge to make Traffa come to you with speed of light.
Basement Event
The main door to the manor will open. Going right through the dining room will lead you to the basement, where your objective is to locate 9 parts of asuran technology that need to be destroyed by interacting with them and waiting for Traffa to come to you and destroy them.

There a lot of Elite Bandit enemies in the basement, many of them dealing heavy damage through Bleeding or using Immobilize on you. If you plan to kill them all, Reflects, CC and Condition Cleanse is heavily advised.
After going down the stairs, the most efficient way to clear this is to go right first, destroy the technology in the main hall, then dealing with the right wing and then going back to the left wing, since the exit of the basement is located there.
This part is done very easily by a class that has a ton of Stealth access like Thief while the rest of the party goes to left side of the mansion, where this door will open once the Basement Event is done.

In the left wing, two optional bosses are waiting for you. Delilah is placed in the room with 2 s in front of them. She's very deadly because she will inflict a lot of Poison, deal high power damage and will regularily Knockback you.
In the very last room of the wing, you will encounter Sure-shot Seamus. He will burst you with a lot of Bleeding with his pistols in the beginning, but will switch to a Shotgun when reaching 95% health. From now on, he will repeatedly Launch, do Bleeding and damage you with an unreflectable skill. Since the Launch lasts longer than the cooldown of this attack, it is very easy to get stuck in a CC chain. He turns friendly at 25% health and gives no loot.
It is heavily advised to Stealth past these two bosses since they have a lot wipe potential and low rewards.
Vista Lawn
Gunpowder Morgan
After the Basement Event is done, the doors to the Vista Lawn in the basement and ground floor of the mansion will open. Head to the barn in the west. When entering the barn, a cutscene will play. After everyone skipped the cutscene, the boss inside the barn, Gunpowder Morgan, will turn hostile, together will different several Bandit Riflemen and Elite Bandit Riflemen standing at the upper floor of the barn. They will shoot you down with range attacks that can deal up to very high damage.
Use reflects and projectile destructions to reduce the pressure from the Riflemen.
Gunpowder Morgan has 2 attacks:
- Kick: Resemble's the Warrior's . Deals Knockback and some damage. Only happens when fighting him melee.
- Throw Bomb: Throws a bomb that creates an AoE when landing, inflicting Vulnerability. This ttack is undodgable. Can be reflected or destroyed. Occasionally, he will spin and cast multiple Throw Bomb simultaneously, which is deadly when you're within melee range.
If you Stealth and not trigger the Riflemen, you can hide under the stairs, hug the wooden construction and range the boss down. It might take longer but makes this fight a piece of cake.
It is possible for one person to hold the cutscene while the rest of the party walks up to Morgan and prepares reflects before the last person skips the cutscene.

Western Tunnel
After Morgan dies, the back wall of the barn will explode and reveal a cave filled with some Bandit enemies. These either need to be killed or pathed with Stealth or they will follow you through the whole dungeon.
Pathing is the process of walking up to enemies while in Stealth until they stand still. After they stop moving, you can move away stealthed to prevent them from following you.
In the corridor to the right, you find more Bandits with a , a and a . Either kill them or Stealth by. When the path forks, go right to face Bloody Victoria.
Bloody Victoria
Victoria is a Thief and has the following attacks:
- Slash: Resembles , hits for medium power damage. The only attack she does while she is visible.
- She occasionally stealths and gets access to one of the two attacks:
- Death Blossom: Resembles Thief's . She spins at hits you 3 times, inflicting 2 stacks of Bleeding each hit.
- Backstab: Stuns you for 3 seconds and iniates a with a very long animation right after, almost guaranteed to one-shot you. Bringing a stunbreak is essential if you don't want to die, since the Stun lasts longer than the time needed for the . Keep in mind that she can turn while doing this attack, so going behind her won't save you and you need to gain distance.
Once in Stealth, she will stay like that until she can perform one of her attacks. Even though she can be damaged, running away won't save you.

Killing Bloody Victoria spawns .
Hidden Workshop to Hidden Falls Dock
Way to Frost
Take the other path of the forked way and you enter the Hidden Workshop, a cave filled with dozens of Bandit enemies. You'll die quickly if you enter without preparation. It is advised to Stealth to bypass or use projectile mitigation if you don't have Stealth access. Climb up the wooden ramp to the right when entering the room. Jumping over the ledge at the end of said ramp will also break enemy fixation.

Stealth through the next room, Bandit's Supply Room, or bring projectile mitigation. Right at the end, there are 3 more enemies that require either pathing with Stealth or to be killed. Go down the wooden stairs to face the endboss, Frost.
If your class has good Stealth access, you can use a portal in combination with to port your party through the Bandit cave and straight to the endboss.

Frost
After a cutscene, Frost will spawn 3 s.He will regularily cast Frost Aura on himself, so attacking him will Chill you. Other than that, he only has two attacks:
- Frost Jet: He casts a beam attack in front of him, similar to the Engineer's . This will only cause low damage, but since it hits for many times, it can easily become quite dangerous. Also applies Chilled for a second on every hit.
- Whirlwind Attack: He throws an ice projectile that will trap you in an Ice Shard, causing a 5 second Stun. The stun will end earlier if you or another party member destroys the Ice Shard. The Shard has very low HP and is a one-hit with almost every attack. Only casts when fighting him ranged. Every 25%, there will be an Elite PWR 935i around the camp becoming hostile, they will chase after you and pressure you with some damage, so try to passively or even actively kill them when they become hostile.
