
General Gameplay Tips
Most of your damage comes from using Dragon Slash—Force. Try to tweak your rotation to do this as many times as possible during a phase and be ready to do your opening again after every downtime phase.
Managing your stacks is the key for high DPS. You can precast your gunsaber skills during downtime.
Try to actively position yourself correctly using Flicker Step.
Spirit Vale
Vale Guardian
| Skills | Weaponset |
|---|---|
Don't spam your Flicker Step so you can use them to blink out of or reposition yourself if you are too close from a Seeker.
Triggerguard will only block 1 so don't rely on it.
On last phase if your tank decide to run the marathon and move the boss all around, save some Flicker Step to blink around. Don't hesitate to use Dragon Slash—Boost if you are out of mobility options.
Split phases
You can use Dragon Slash—Force followed by and another Dragon Slash—Force and it will still be available for the next phase.
The CC of Dragon Slash—Force is applied after the damage so don't hesitate to use Dragon Slash—Force if the add is low hp.
Gorseval
| Skills | Weaponset |
|---|---|
Save your Triggerguard to block .
Keep doing your rotation during the Breakbar, your Dragon Slash—Force will naturally participate on breaking it.
When Gorseval uses you can stand outside of it and Dragon Slash—Force will still have the range to hit.
For last phase keep some Flicker Step to blink out of eggs mechanics.
Split Phase
Don't be conservative on split phase, you can use Dragon Slash—Force and but still recover it for the next phase.
Every Angered Spirit will apply Weakness to players around them. If you are not confident on your Resistance uptime to counter the effect, you can stand outside of the Add area of effect and still have the range to hit your Dragon Slash—Force.
Sabetha
| Skills | Weaponset |
|---|---|
Try to not stay close to hitbox all the time or you will kite every Time Bomb.
Always be conservative on Flicker Step if a flamewall is coming. You can blink across the flamewall. If you are out of Flicker Step just cancel and move out of the flamewall.
Continue your rotation on add phase, don’t save skills.
When adds spawn they have an Invulnerable window, be careful to not waste Dragon Slash—Force on it. Same tips apply when sabetha reach every 25%.
Be smart if you have Time Bomb. Never bomb your squad. If you get it when charging : use Flicker Step out. Cancel as a last resort.
If you are doing cannon, you can charge on the bumping platform and release Dragon Slash—Force on the cannon.
You can use Break Step for mobility to reach bumping platform.
Salvation Pass
Slothasor
| Skills | Weaponset |
|---|---|
Pistol opener allows you to do the two first Dragon Slash—Force before can hit you.
Even if you have very few range options, when you get Fixated accept your fate and move out.
In slow cc groups you can fit a Dragon Slash—Force at the beginning of the Breakbar and still recover it when the cc is finished.
Positioning is key on this fight. Use Flicker Step to reposition yourself never be stuck in or .
If you get mechanics you can use Break Step to quickly move out of the group.
Try to actively use Dragon Slash—Force on Slothasor and Slubling to help your squad on cleave.
Matthias
| Skills | Weaponset |
|---|---|
Slightly delay opener so you don’t waste Dragon Slash—Force in the Blood Shield.
Use Break Step for mobility if you have the corruption mechanic.
You can Dragon Slash—Force the sacrificed player (sacrificed player recieves a lot of toughness so don’t be afraid to slash them) for some CC.
Don’t hesitate to use Dragon Slash—Boost if you are out of mobility options to reach the boss.
Be careful with Cyclone Trigger as it destroys projectile during Blood Shield.
Stronghold of the Faithful
Keep Construct
| Skills | Weaponset |
|---|---|
Keep Triggerguard for .
Actively Dragon Slash—Force Keep Construct and Adds.
Use Dragon Slash—Force on the Breakbar.
Manage your stacks when your pusher is pushing the orb around so you end up with 10 stacks when Keep Construct comes back in the middle. You can precast on every downtime before the boss comes back.
Keep Construct stays Stunned for the duration of Compromised.
It is recommended to use instead of with these additional Assassin's pieces , , 1 Assassin's and 1 Assassin's .
Xera
| Skills | Weaponset |
|---|---|
The Pre-Event
You can use Dragon Slash—Force and on pre event and recover it for the phase.
If the group is fast (one shot crystal on button minigame) only cast on the first platform of the minigame to recover it for the phase.
Communicate with your team that you have very few range skills so they don't put you on a button for the minigame. If you have no other option, use Dragon Slash—Reach and Artillery Slash.
Precast stacks while waiting on the platform before the main arena.
Main Fight
If you need to cleave shards, charge from the middle and aim at the shard then use Dragon Slash—Boost to hit Xera + Bloodstone Shard.
On phase 2 if you are teleported on the first minigame use Dragon Slash—Force on the Bloodstone Shard and you will recover it for the phase.
Bastion of the Penitent
Cairn
| Skills | Weaponset |
|---|---|
Be conservative on Flicker Step and use it to blink out of .
If you get teleported use Celestial Dash or Break Step to get back in position.
Mursaat Overseer
| Skills | Weaponset |
|---|---|
Golem rotation. Keep some Flicker Step to not be stuck on spikes.
Samarog
| Skills | Weaponset |
|---|---|
Main Fight
Flicker Step to blink across the wave to not get hit.
Avoid getting Fixated at all cost.
If your team is slow on CC you can use Dragon Slash—Force early on the breakbar and recover it when he becomes vulnerable again.
If someone betrays you with , warrior has a large pool of hp and you will most likely survive.
Be very conservative on Flicker Step as you will need to constantly blink behind Samarog to avoid getting Knockback by .
Split Phase
Time your Dragon Slash—Force correctly : don’t use it when there is a green shield around Guldem or it will hit for 0.
Deimos
| Skills | Weaponset |
|---|---|
Be careful with Dragon Slash—Force on chains as you can deal too much damage on one. Coordinate with your team.
Precast stacks before Deimos arrives on the platform. Either precast directly if you know that your squad will kill all 4 chains in one. If not, start precasting when only 1 chain remains.
Pistol opener with precast perfectly fits so your first Dragon Slash—Force hits on the Unnatural Signet.
Use Flicker Step to position yourself in only 1 then use Triggerguard to provide yourself with Aegis.
also provides you with self Aegis.
Don’t save skills on the add phase.
Always keep some Flicker Step to blink out of .
Try to actively cleave Saul the Thief and Deimos with Dragon Slash—Force.
Mythwright Gambit
Conjured Amalgamate
| Skills | Weaponset |
|---|---|
Don't skill save on the first hands. Your skills will be back for the main phase.
Make sure that your Dragon Slash—Force hit when there are enough stacks of Conjured Greatsword on the boss.
Triggerguard and give you self Aegis to avoid getting Knockdown by .
Qadim
| Skills | Weaponset |
|---|---|
Main Fight
Doing a opener on the Hydra will allow you to get a Dragon Slash—Force ready when the Breakbar appears.
Take the time to charge your stacks on the Pyre Guardian before going on Qadim.
You can use Flicker Step to blink through the .
Destroyer
Start with a Dragon Slash—Force on the Apocalypse Bringer to help with the Breakbar.
Lamp Three
If you need to go inside the 3rd lamp use Break Step and Dragon Slash—Boost to move quickly through the rooms.
The Key of Ahdashim
Cardinal Adina
| Skills | Weaponset |
|---|---|
Main Fight
Precast your stacks behind the Pillar as well as your .
When Adina sends her you can immediatly use Break Step to get in range and start doing your Pistol opener. You will need to cast Flicker Step fast enough after so you do not get a Pillar.
If you have to hide behind a pillar during the phase, you can precast your Dragon Slash—Force then teleport close to Adina with Flicker Step.
Split Phase
- 75% : You can use Dragon Slash—Force on the 1st Hand of Erosion and recover your slash for the boss.
- 50% & 25% you can slash the 1st and 3rd Hand of Erosion and recover your slash for the boss.
It is possible to hit two Hands with a single Dragon Slash—Force.
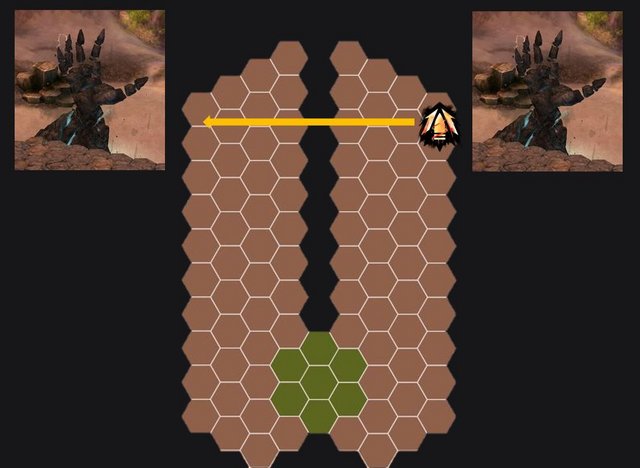
-75% : Position yourself at the top right of the arena and start charging while looking at the left Hand. When the Hands visually erupt from the ground, count 3 seconds and unleash your Dragon Slash—Boost.
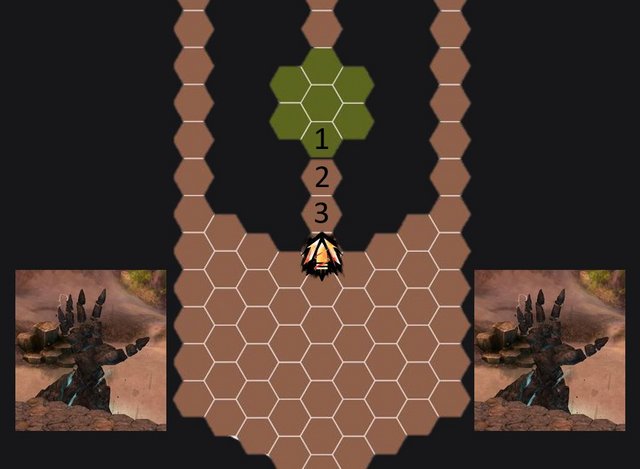
-50% & 25% : Position yourself at the edge of the 4th tile (starting from Adina's position) and look straight in front of you without targeting anything. When the Hands visually erupt from the ground, count 3 seconds and unleash your Dragon Slash—Force. You can activate your Triggerguard right before slashing to block a potential projectile coming from the hand.
Cardinal Sabir
| Skills | Weaponset |
|---|---|
Make sure that you don't waste your burst if a Breakbar Phase is about to occur.
At 40% you can deal with the Voltaic Wisps by charging a Dragon Slash—Force and teleport directly on the Voltaic Wisps plateform thanks to Flash Discharge.
Swap your for as this will let you deal with .
Be careful as doesn't protect you from !